
Getting Started
PixBob Font Studio
PixBob Font Studio is a pixel font editor and bitmap font tool built for pixel artists, indie game developers, and game jam developers. Draw glyphs on a fixed pixel grid, preview them as real text while you work, and export a font your engine or design tool can actually use — as a proper vector font (TTF/OTF/WOFF/WOFF2) or as a ready-to-use bitmap font atlas (FNT, XML, JSON, or PNG).
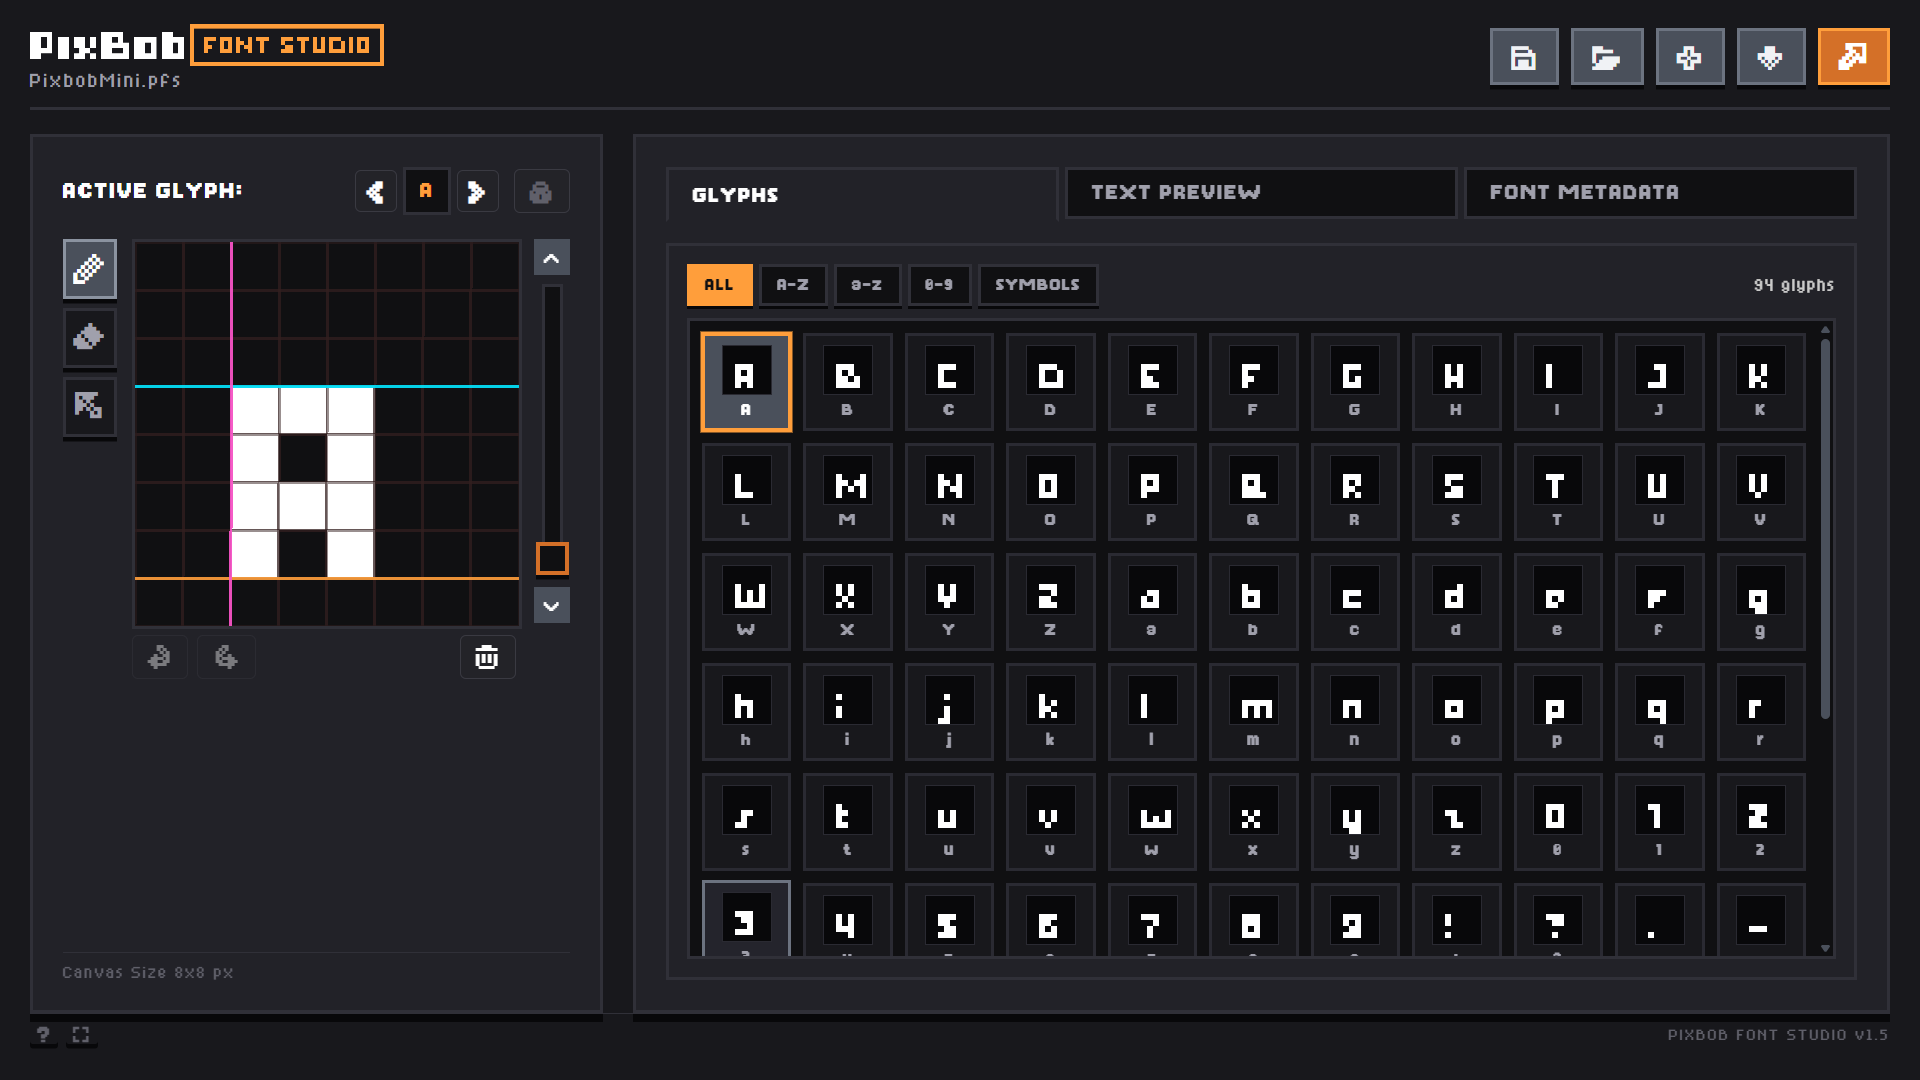
What you can do
- Draw pixel-perfect glyphs on an adjustable 8 x 8 to 16 x 16 grid.
- Preview your font as live, editable text while you draw.
- Fine-tune spacing, height, and baseline with visual, draggable guides.
- Import an existing TTF/OTF as a pixel-sampled starting point.
- Export to vector formats (TTF, OTF, WOFF, WOFF2) or bitmap formats (FNT, XML, JSON, PNG atlas).
- Save your work as a
.pfsproject file and pick up exactly where you left off.
Who this is for
You don't need any font-design background to use PixBob. If you've ever drawn pixel art, the Glyph Editor will feel familiar — a font is just a set of small pixel drawings with a bit of spacing math behind them.
Web vs. Desktop
PixBob Font Studio runs both as a web app in your browser and as a native desktop app (built with Tauri). Both share the same interface and features — the differences are in how files are saved and opened.
| Web (browser) | Desktop app | |
|---|---|---|
| Saving a project | Uses your browser's file picker (on supported browsers) or downloads directly to your Downloads folder | Uses your operating system's native save dialog and writes straight to disk |
| Quick Save | Reconnects to the last file if your browser supports it; otherwise re-prompts for a location | Always overwrites the last saved file path directly, no prompt |
| Opening a project | File picker, or drag-and-drop the file into the window | File picker, drag-and-drop, or double-clicking a .pfs file in your file explorer |
| Autosave / recovery | Kept in your browser's local storage — tied to that browser and device | Kept in the app's own local storage on disk |
| Unsaved-changes warning | Browser shows a "leave site?" prompt if you try to close the tab with unsaved changes | Handled by the app window itself |
Tip
Whichever version you use, get in the habit of using Save As the first time you create a project, so PixBob has a real file location to Quick Save to afterward.
Creating Your First Font
-
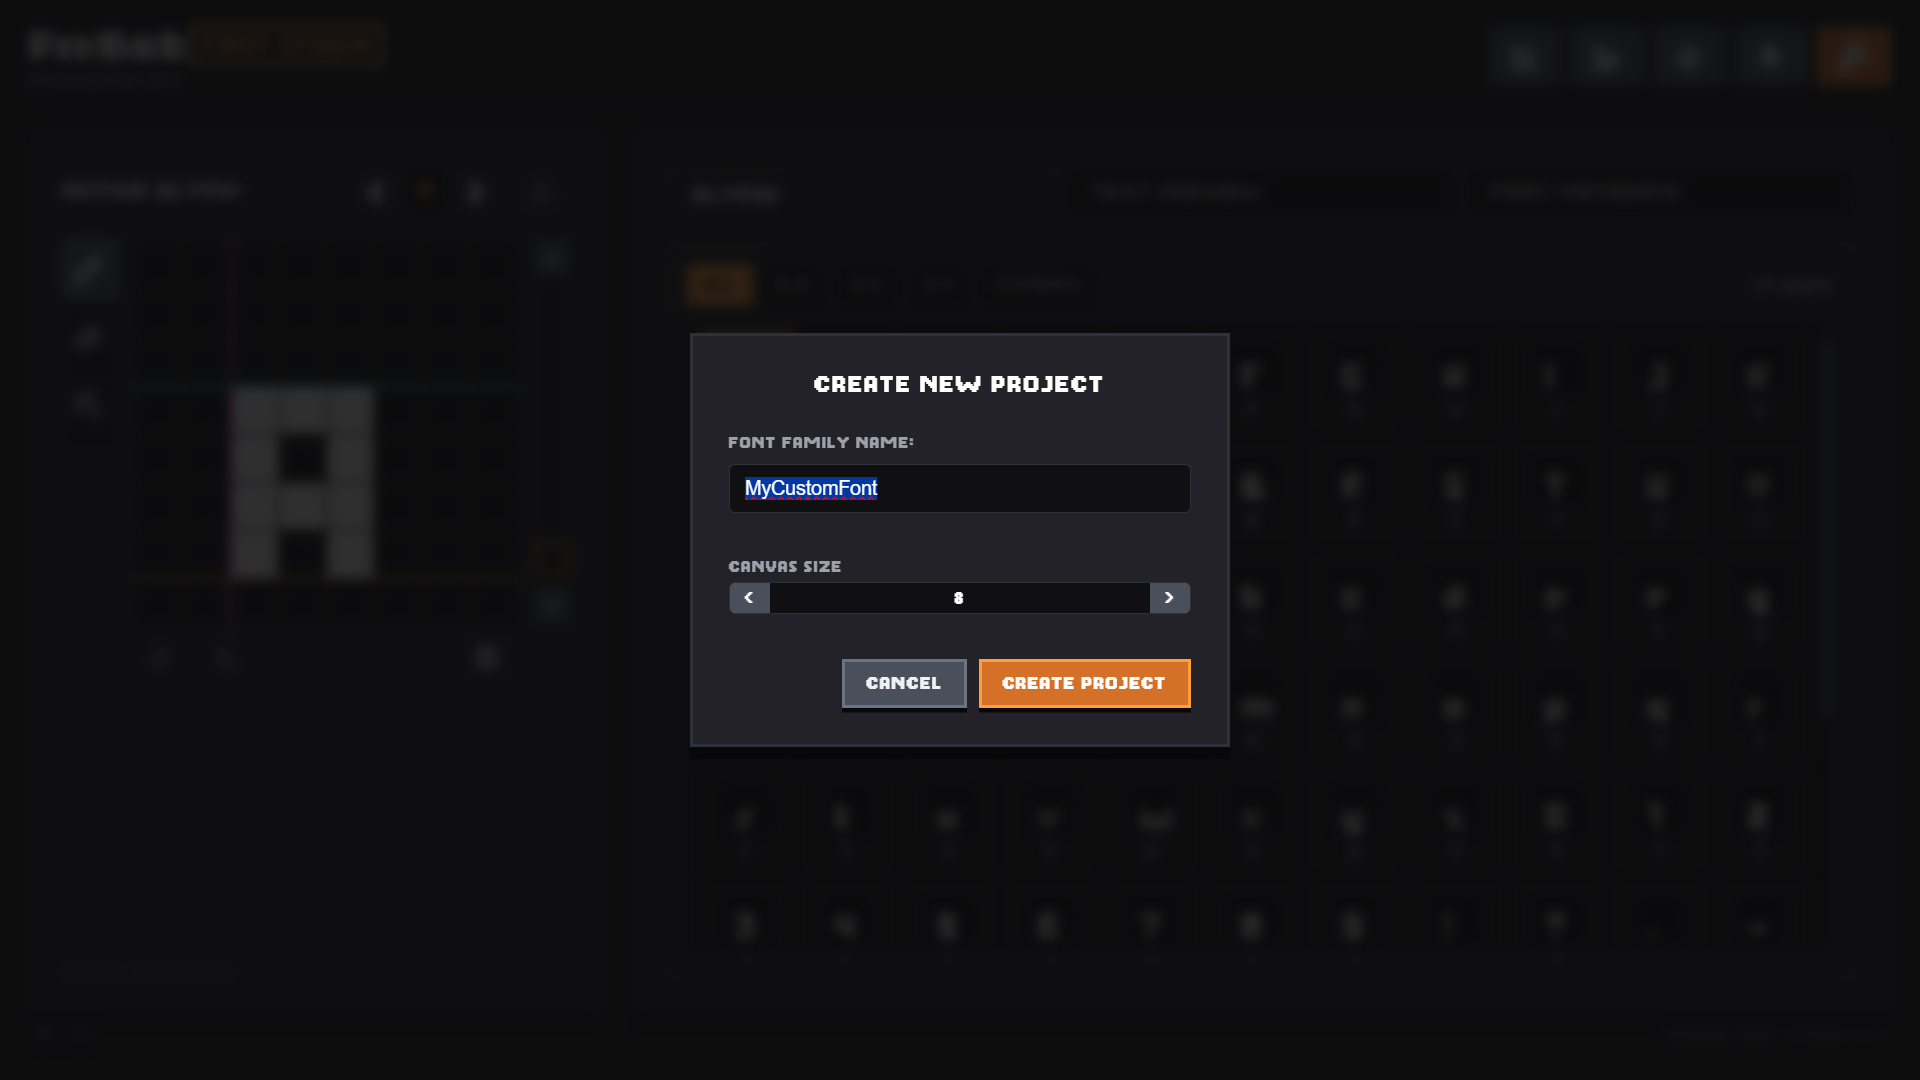
Start a new project. On launch, choose New Project from the welcome screen (or the N button in the header at any time). Give your font family a name and pick a canvas size — you can change the canvas size later, but starting with the right one saves you a resize down the line.
- Pick a glyph. The Active Glyph box at the top of the editor shows which character you're currently drawing — type a character directly into it, or use the arrows to step through your character set.
- Draw. Select the Pencil tool and click or drag on the canvas to fill pixels. Switch to Eraser to remove them, or hold the right mouse button to erase without switching tools.
- Check your spacing. Switch to the Text Preview tab to see your glyphs as real, readable text as you draw more of them.
- Fill in metadata. Switch to the Font Metadata tab and add a family name, designer, and license before exporting — these become part of the exported font file.
- Export. Click Export Font, choose Vector or Bitmap, select your format(s), and save.
Basic Workflow
Most PixBob projects follow the same general path, whether you're making a full 96-character font or just a handful of glyphs for a game jam:
None of these steps are strictly locked to that order — you can jump back to drawing after exporting, adjust metrics halfway through, or add metadata first. But for a first pass, following this order means your Text Preview and export both reflect finished, correctly-spaced glyphs rather than a half-drawn set.
Editor
Interface Overview
The editor is split into two panels: the Glyph Editor on the left, where you draw, and the Workspace on the right, where you browse glyphs, preview text, and edit font metadata.
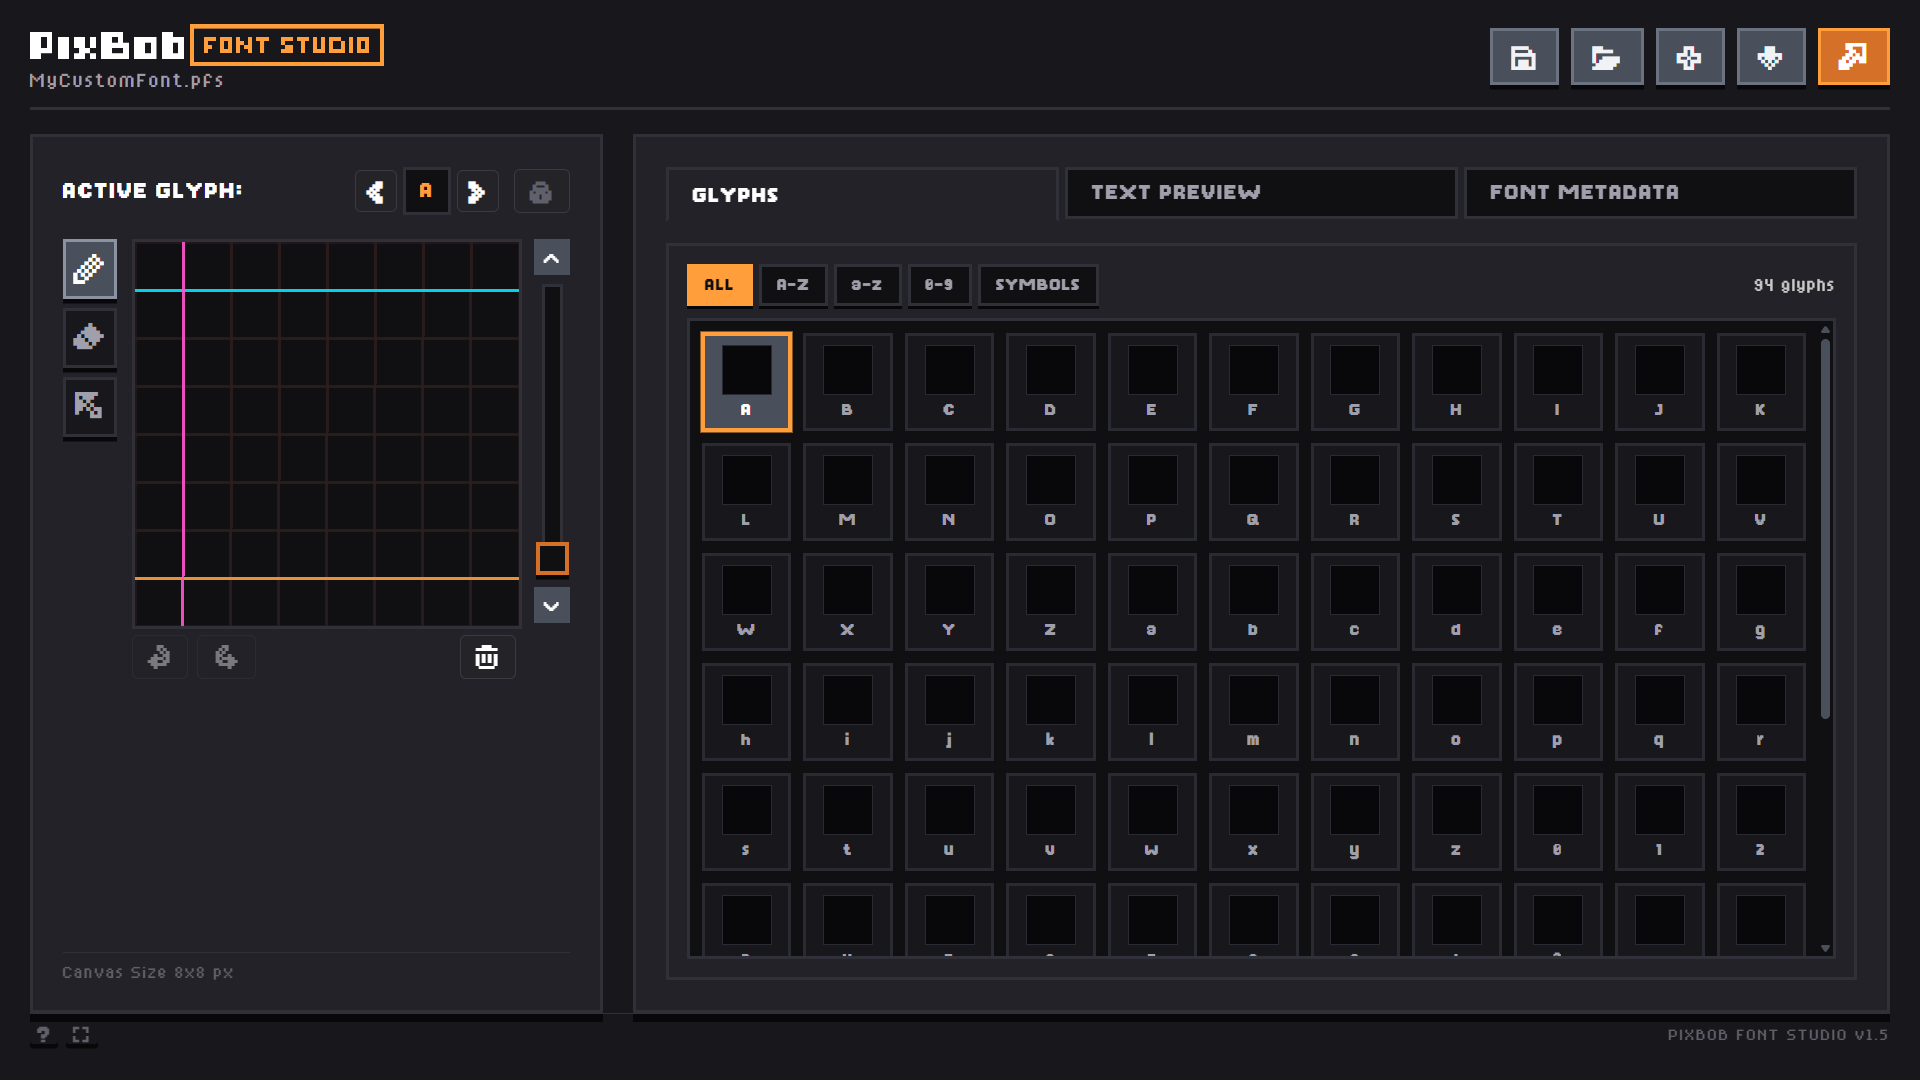
| Area | What it's for |
|---|---|
| Header | Project filename, Save / Save As, Open Project, New Project, Import TTF/OTF, Export Font |
| Active Glyph box | Shows and lets you switch the character currently being edited, plus canvas lock |
| Left panel — Glyph Editor | Pixel canvas, drawing tools, canvas size control, undo/redo, clear |
| Right panel — Workspace | Three tabs: Glyphs (library grid), Text Preview (live preview + metrics), Font Metadata |
| Footer | Help / About, fullscreen toggle, version number |
Glyph Editor & Drawing Tools
The Glyph Editor is where individual characters get drawn, one at a time, on a fixed pixel grid.
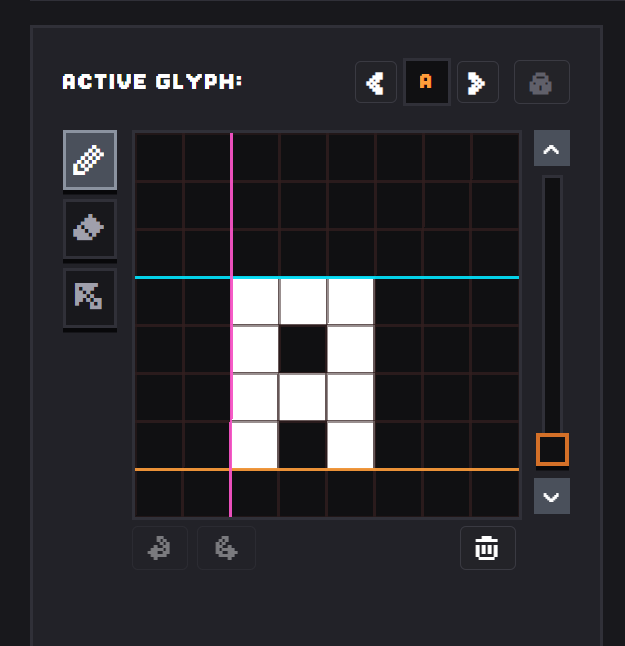
Tools
| Tool | Left-click / drag | Right-click |
|---|---|---|
| Pencil | Fills pixels | Erases pixels |
| Eraser | Clears pixels | Erases pixels |
| Move | Drags the entire glyph's pixels by the offset you drag | Not applicable |
Tip
Right-click always erases, no matter which tool is active — a quick way to fix a stray pixel without switching tools.
The Move tool doesn't nudge one pixel at a time — it shifts the whole glyph as a single shape, based on how far you drag from your starting point. Pixels that get pushed outside the canvas are dropped, not wrapped around.
Clear Canvas wipes every pixel from the currently active glyph only — other glyphs in your font are untouched.
Glyph Library
The Glyphs tab in the Workspace panel shows every character in your font as a small preview tile. Click any tile to make it the active glyph in the editor.
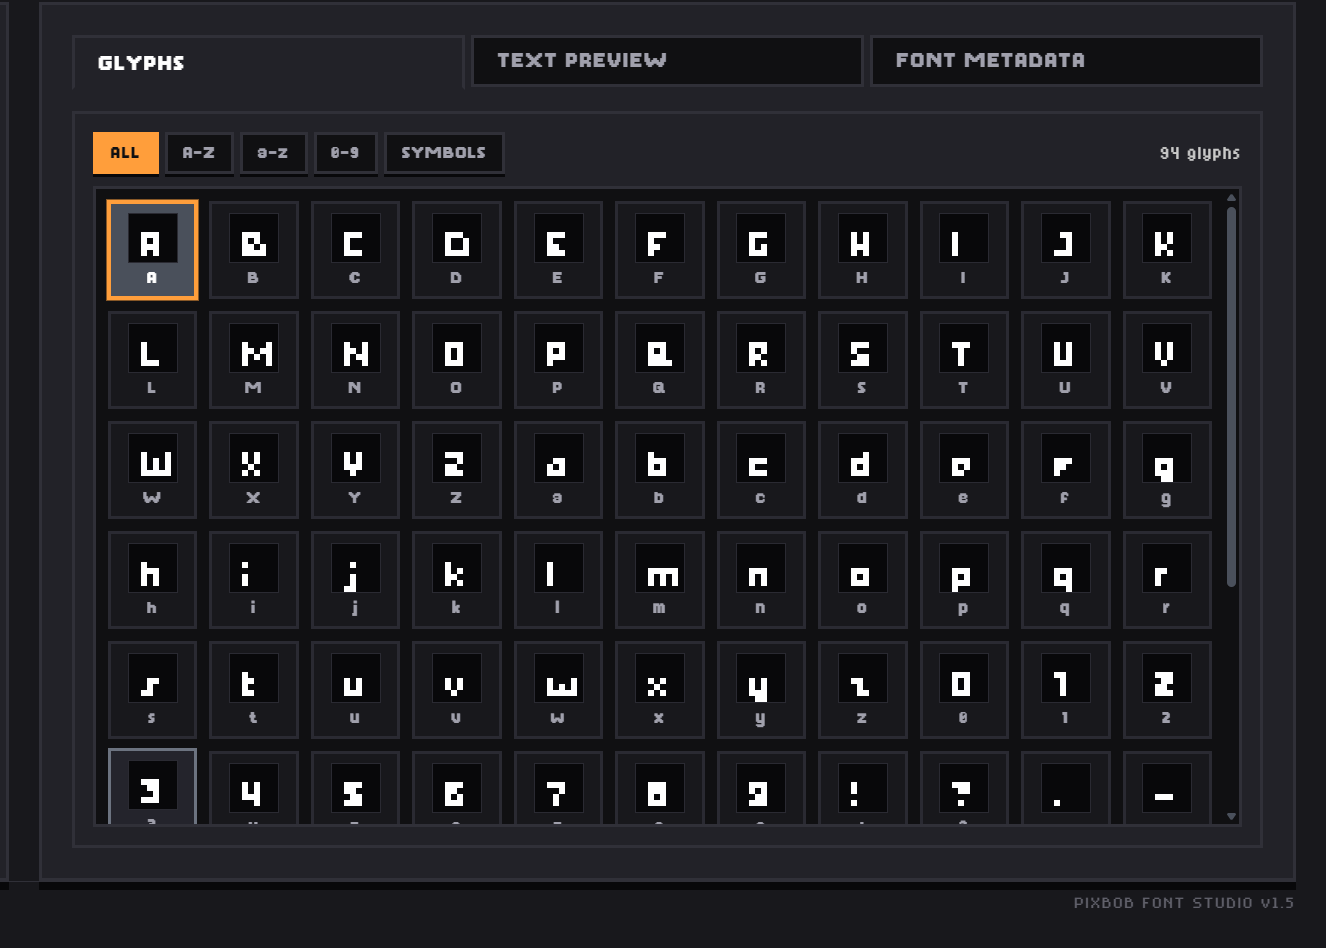
Use the category tabs to narrow the grid down:
| Category | Characters |
|---|---|
| All | Every character below, combined |
| A–Z | Uppercase letters |
| a–z | Lowercase letters |
| 0–9 | Digits |
| Symbols | ! ? . - + = $ % ~ < > | & ^ ` ( ) [ ] { } / \ _ # @ * " ' : ; , |
The glyph count in the top-right of this tab reflects the currently selected category, not your whole font.
Canvas Size
Canvas size controls the pixel grid every glyph is drawn on — anywhere from 8x8 up to 16x16 pixels. You can set it when creating a new project, or change it later using the vertical slider beside the canvas.
Resizing is non-destructive
Changing canvas size doesn't rescale or resample your existing artwork. PixBob pads new empty rows/columns or crops from the top and right edge, keeping the bottom-left corner — and your baseline — anchored in place. Nothing you've already drawn gets stretched or blurred.
If Canvas Lock (the lock icon next to the Active Glyph box) is on, the canvas size control is disabled — useful once you've settled on a size and want to avoid resizing by accident.
Canvas & Font Guides
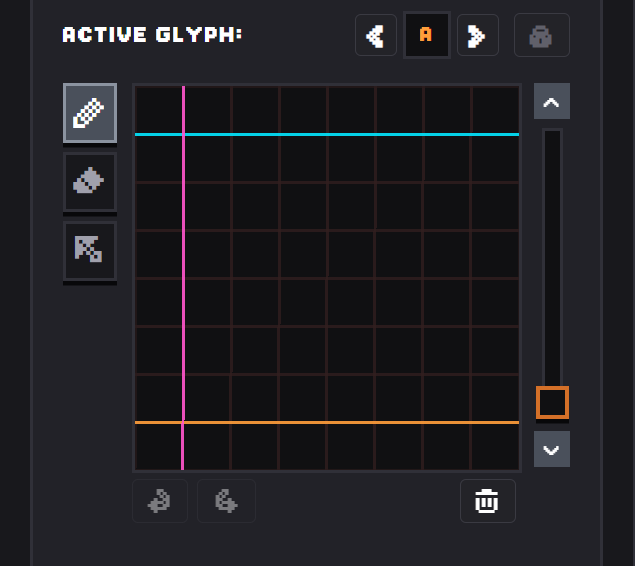
Three colored guide lines are drawn directly on the canvas, matching the values set in the Metrics & Spacing panel:
| Guide | Color | Controls |
|---|---|---|
| Baseline | Orange | Descender value |
| Max Height / Cap Height | Cyan | Max Height value |
| Left Side Bearing (LSB) | Magenta | Left Side Bearing value |
You don't have to use the Metrics panel's steppers to adjust these — you can drag any guide line directly on the canvas. Hover near a line until the cursor changes, then drag; the matching Metrics field updates live, and vice versa.
Undo / Redo
Undo and redo are tracked per glyph — switching to a different character doesn't clear or share history with the one you were just editing. Each glyph keeps up to 20 steps of history.
Use Ctrl+Z (undo) and Ctrl+Y or Ctrl+Shift+Z (redo), or the Undo/Redo buttons above the canvas. On macOS, use Cmd in place of Ctrl.
Note
Undo history is cleared whenever you open a different project or start a new one — it isn't saved as part of your .pfs file.
Live Text Preview
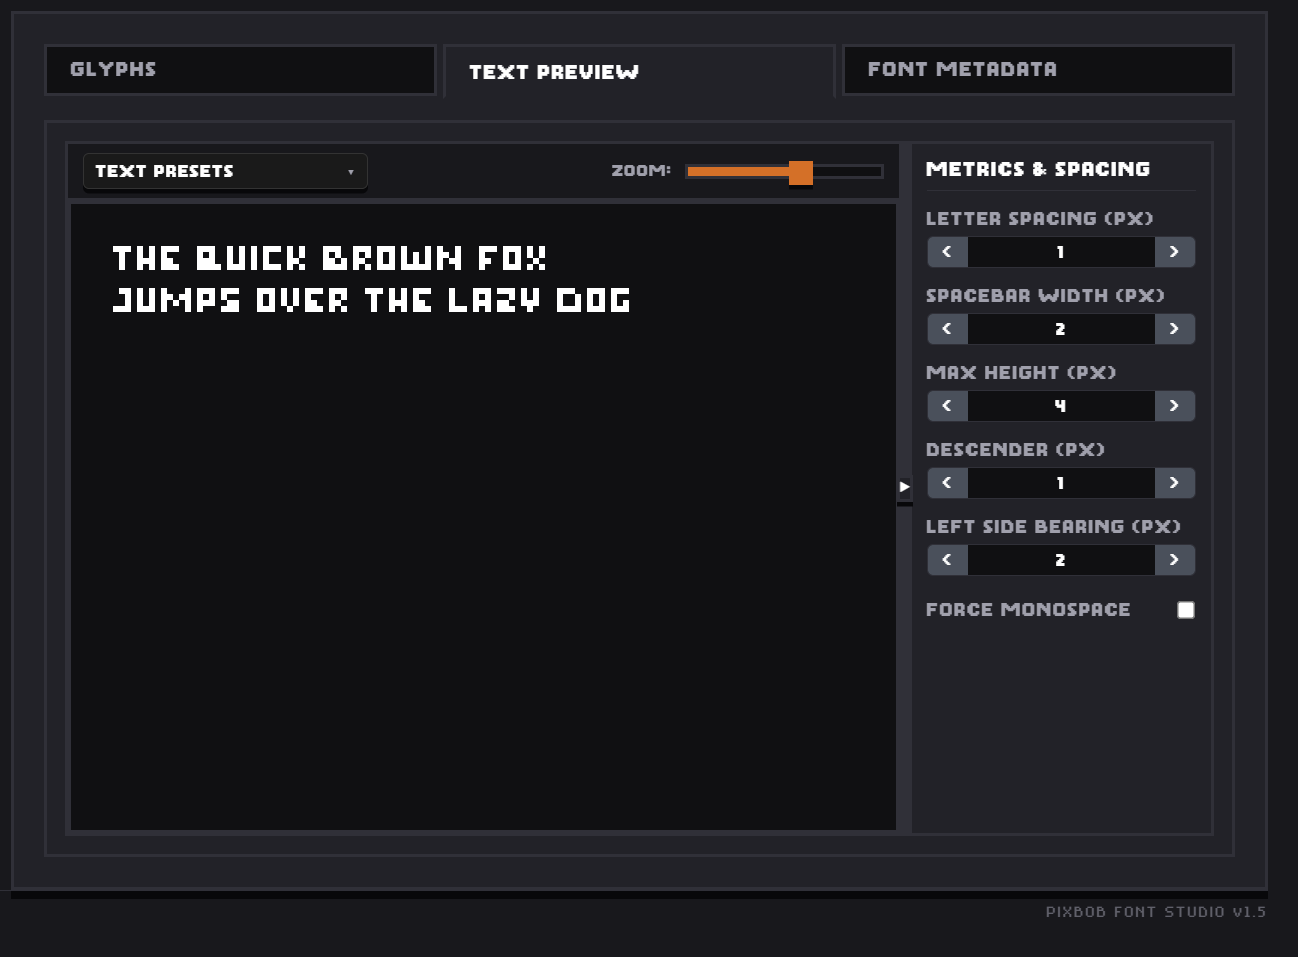
The Text Preview tab renders your glyphs as real, editable text, using your font's actual spacing rules — the same rules used when you export. It's the fastest way to spot inconsistent spacing or misaligned glyphs before exporting.
Editing the preview text
Click directly into the preview to place your cursor and type, just like a text field. It supports selection, its own Undo/Redo history (Ctrl+Z / Ctrl+Y, tracked separately from glyph-canvas undo), and works with on-screen keyboards on mobile.
Text presets
The Text Presets dropdown offers ready-made sample text: Lowercase, Uppercase, Numbers, Symbols, and a Sample Paragraph. Each preset has two actions:
- Add — appends the preset on a new line, keeping whatever text is already there.
- Change — replaces the entire preview text with the preset.
Zoom
The zoom slider (1×–6×) scales the preview only — it has no effect on your exported font.
Metrics & Spacing
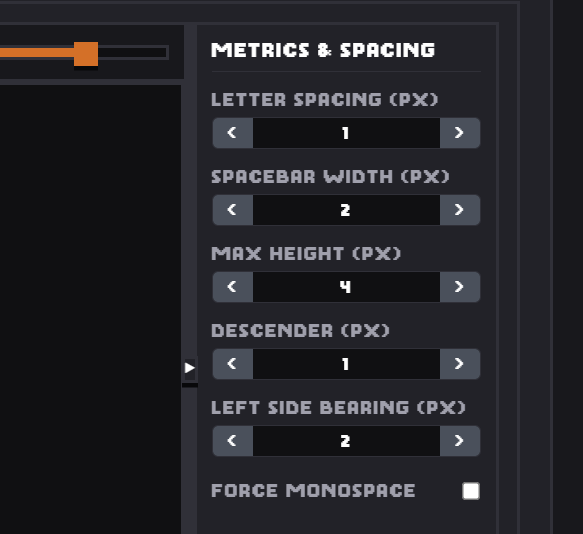
The Metrics panel, alongside the Text Preview, controls how glyphs are spaced and aligned — both in the preview and in your exported font. Every value here is saved as part of your project.
| Control | What it does |
|---|---|
| Letter Spacing (px) | Extra horizontal gap added after every glyph |
| Spacebar Width (px) | Width of the space character |
| Max Height (px) | Distance from the baseline to the cap-height guide — sets the cyan guide line and scales your exported font's ascender |
| Descender (px) | Distance from the bottom of the canvas up to the baseline — sets the orange guide line |
| Left Side Bearing (px) | Left margin before a glyph's drawing area starts — sets the magenta guide line |
| Force Monospace | Makes every glyph advance by the same fixed width (canvas width + letter spacing), ignoring each glyph's actual drawn width |
Tip
A glyph's advance width (how much horizontal space it takes up) is based on its rightmost drawn pixel, minus the Left Side Bearing — not the full canvas width. Enable Force Monospace if you want every character to take up identical width regardless of what's drawn.
Projects
New Project
Start a new project from the welcome screen, or at any time via the N button in the header. You'll be asked for a font family name and a canvas size (8×8–16×16); both can be changed later.
Unsaved changes
Starting a new project doesn't warn you about unsaved work in your current one — save first if you want to keep it.
Open Project
Open an existing .pfs (or .json) project file three ways:
- Click the F Open Project button in the header.
- Drag and drop the file anywhere onto the app window.
- Desktop app only: double-click a
.pfsfile in your operating system's file explorer.
Save & Save As
The Save button opens a small menu with two options:
| Option | Behavior |
|---|---|
| Save (Quick Save) | Overwrites the file you're already working on. If PixBob doesn't yet have a remembered file location for this project, it behaves like Save As instead. |
| Save As… | Always prompts you to choose a new file location, and switches your project to save there from now on. |
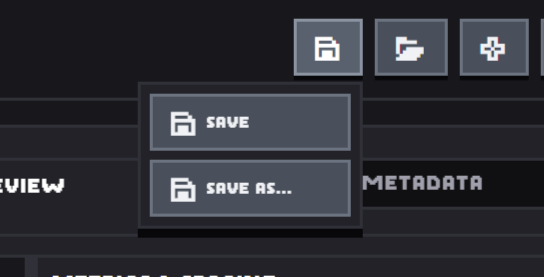
PixBob also autosaves your work locally in the background as you edit, and restores it automatically the next time you open the app — this is separate from explicitly saving a .pfs file, and is only a local recovery copy, not a substitute for saving.
Closing with unsaved changes
If you try to close the browser tab with unsaved changes, your browser will ask you to confirm. The desktop app handles this with its own window-close prompt.
.PFS Project Files
A .pfs file is your entire project — every glyph, your metadata, and your metrics — saved as plain, human-readable JSON. You can open it in a text editor if you're curious, or to fix something by hand.
{
  "version": "1.0",
  "fontName": "MyPixbobFont",
  "gridSize": 8,
  "metadata": {
    "fontName": "MyPixbobFont",
    "subfamily": "Regular",
    "author": "",
    "company": "",
    "version": "1.0.0",
    "copyright": "",
    "license": "",
    "description": "",
    "designerUrl": "",
    "metrics": {
      "letterSpacing": 1,
      "spaceWidth": 4,
      "maxHeight": 6,
      "descender": 1,
      "leftBearing": 1
    }
  },
  "fontData": {
    "A": [[0,0,1,0,0,0,0,0], "…7 more rows…"],
    "B": ["…"]
  }
}
A few things worth knowing about the format:
- Each entry in
fontDatais one character, stored as a 2D grid of0s and1s —1means a filled pixel. gridSizerecords the canvas size the project was drawn at. Older.pfsfiles saved before this field existed are still supported — PixBob detects the size from the glyph data itself.- Because it's just JSON,
.pfsfiles are easy to version-control, diff, or generate/edit with your own scripts.
Editing by hand
If you hand-edit a .pfs file, make sure every row in every glyph's grid has exactly gridSize entries. Mismatched row lengths can cause glyphs to render incorrectly when reloaded.
Import TTF / OTF
PixBob can import an existing .ttf or .otf font as a starting point, converting each character into a pixel-sampled glyph on your chosen canvas size.
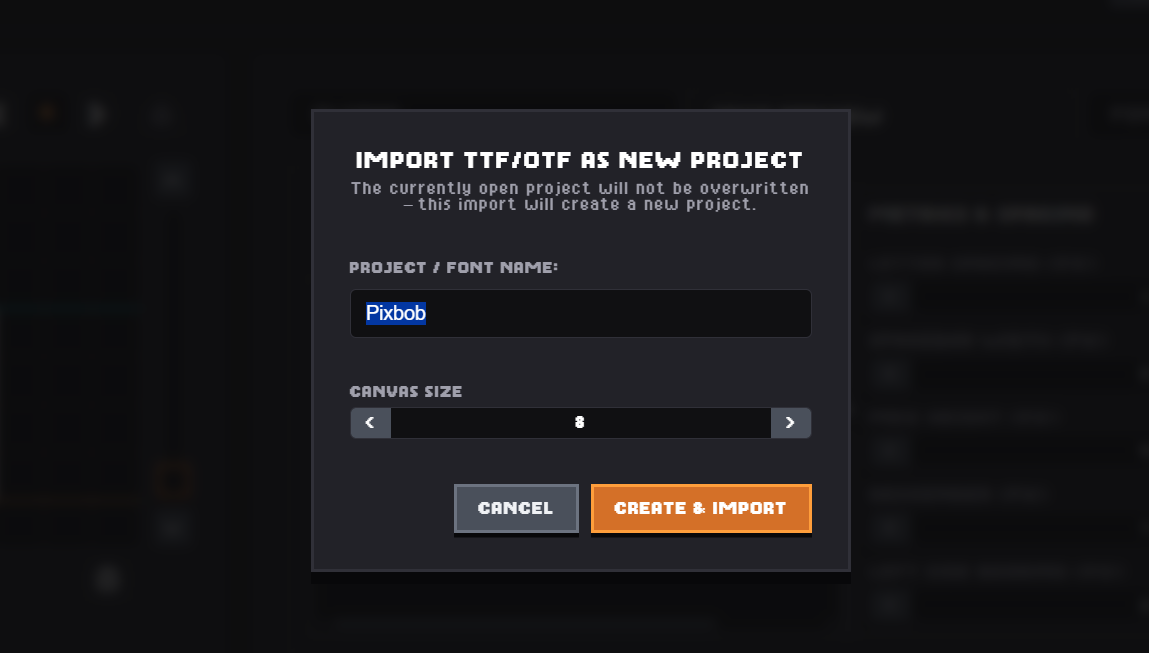
Always creates a new project
Importing a TTF/OTF file never overwrites your current project. It always creates a brand-new one — named after the imported file by default — and asks for a canvas size before importing. If you have unsaved changes open, PixBob will ask whether to save them first.
How the conversion works
Each glyph is rendered at high resolution, then sampled down to your grid based on brightness — so it's a close visual approximation of the original letterform, not a perfect vector-to-pixel trace. Only standard printable characters (basic Latin letters, numbers, and punctuation) are imported; anything outside that range is skipped. Imported glyphs are automatically centered horizontally; vertical placement follows the source font's own baseline.
Tip
Imported glyphs are a starting sketch, not a finished result — expect to clean up antialiasing artifacts and tighten up strokes by hand afterward, especially at smaller canvas sizes.
Font Information
Font Metadata
The Font Metadata tab holds the information that gets embedded into your exported font file — the details other apps and operating systems read to identify and display it correctly.
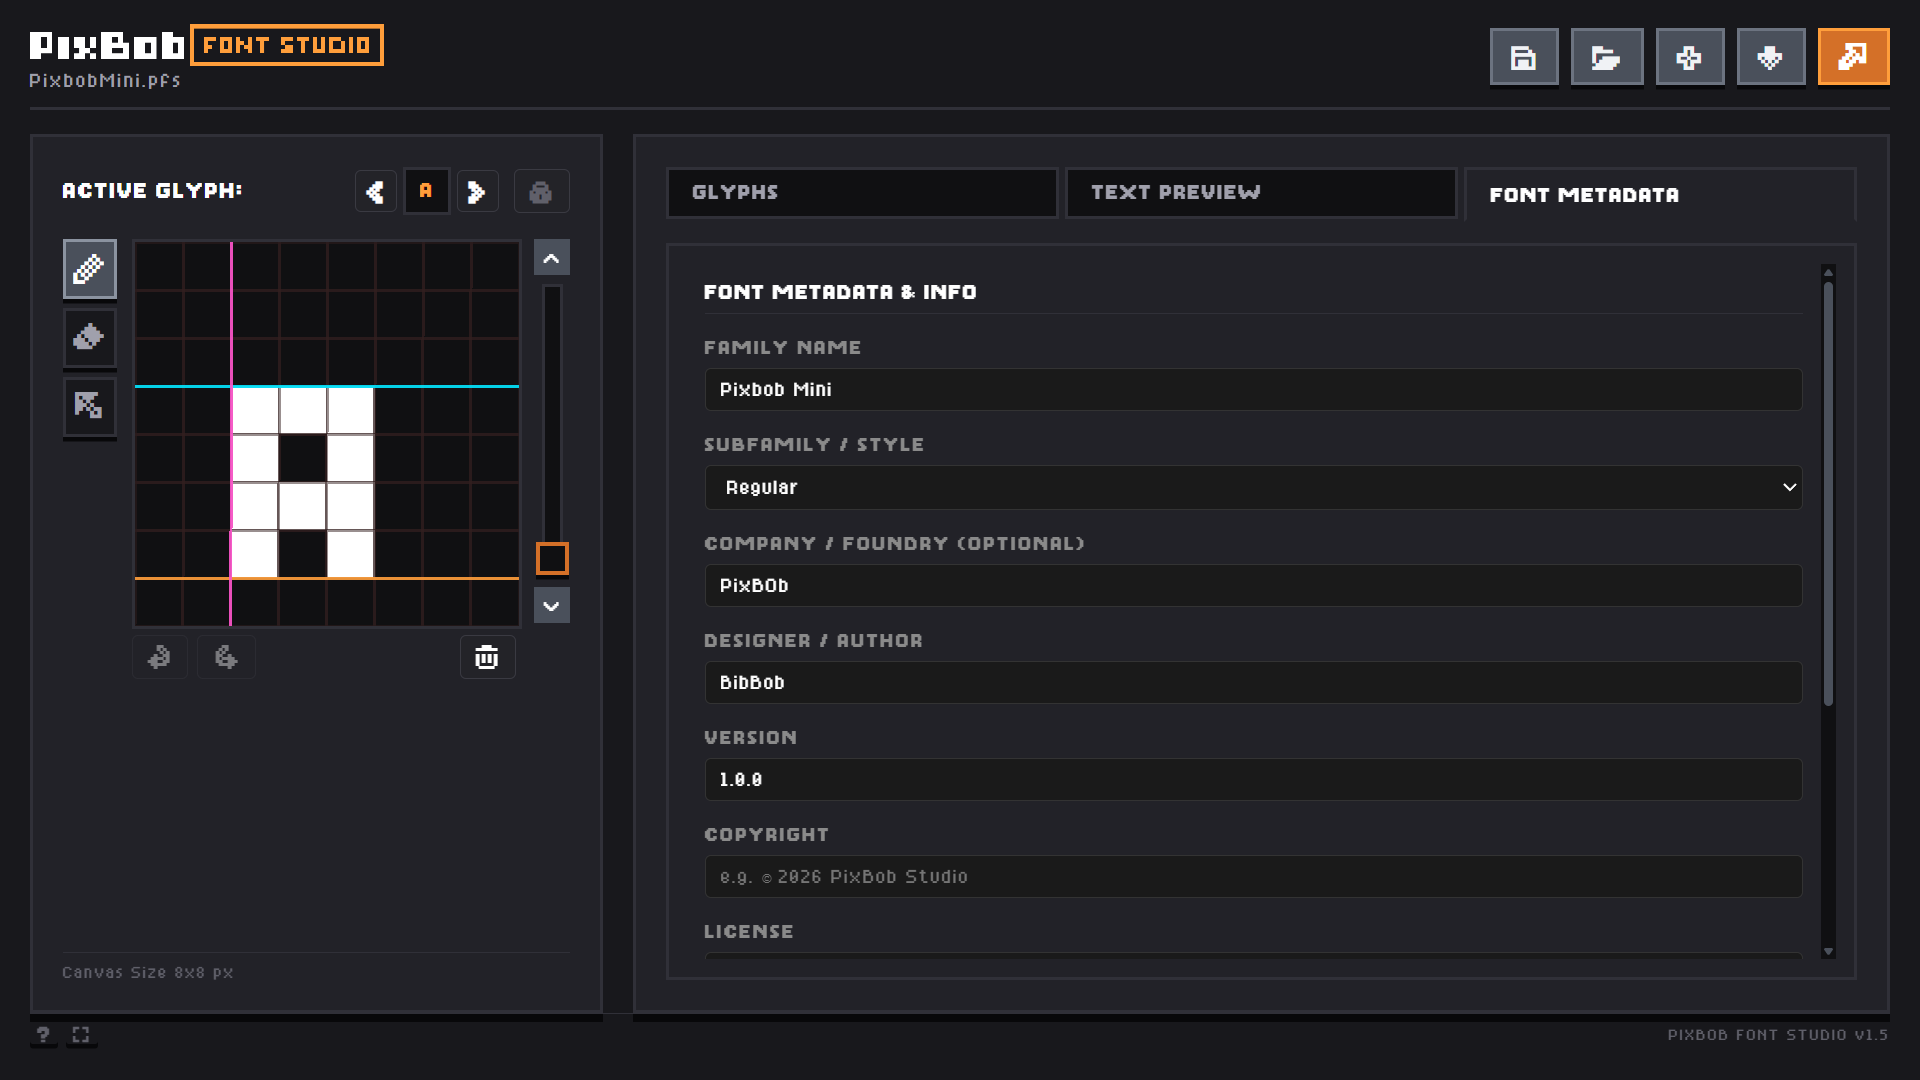
| Field | Notes |
|---|---|
| Family Name | The name your font will appear under in font menus |
| Subfamily / Style | Regular, Bold, Italic, Bold Italic, or a Custom style name |
| Company / Foundry | Optional — falls back to Designer / Author if left blank |
| Designer / Author | Your name or studio name |
| Version | Free-text version string, e.g. 1.0.0 |
| Copyright | Embedded in the font's copyright metadata field |
| License | See License Options below |
| Description | A short description of the font |
| Designer / Foundry URL | Optional link embedded in the font file |
Custom subfamily names and font installation
Operating systems only truly recognize four subfamily styles as belonging to the same family: Regular, Bold, Italic, and Bold Italic. If you use a custom subfamily name (like "Tall" or "Mini") to create a stylistic variant, PixBob automatically folds it into the family name instead (e.g. "MyFont Tall") rather than treating it as a style of "MyFont." This avoids a real problem on Windows, where two same-named fonts with non-standard styles can be mistaken for duplicates and fail to install side-by-side.
License Options
The License field controls what's embedded in your exported font's license metadata. Pick a preset, or choose Custom to write your own terms.
| Option | Description |
|---|---|
| Custom | Write your own license terms for this font. |
| SIL Open Font License (OFL) | Allows the font to be used, modified, and redistributed under standard OFL terms. |
| Public Domain / No Copyright Restrictions | Released without copyright restrictions, to the extent permitted by law. |
| Free for Personal Use Only | Free for personal and non-commercial projects; commercial use needs a separate license. |
| Standard Commercial License (EULA) | Allows commercial use of the font under this license's terms. |
This is separate from the PixBob Free Font License, which covers what you're allowed to do with fonts made using PixBob Font Studio itself — the License field here is what you tell other people about your finished font.
Export
Vector Fonts
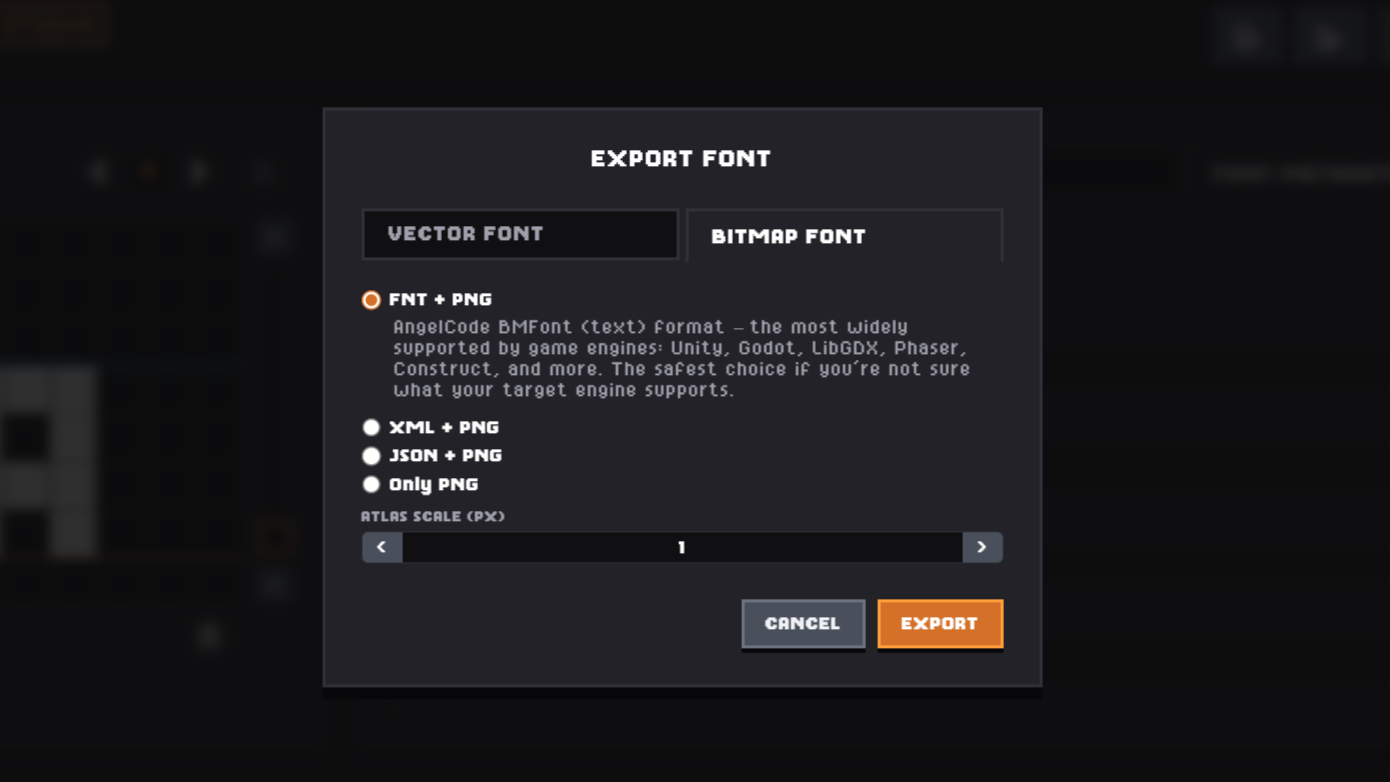
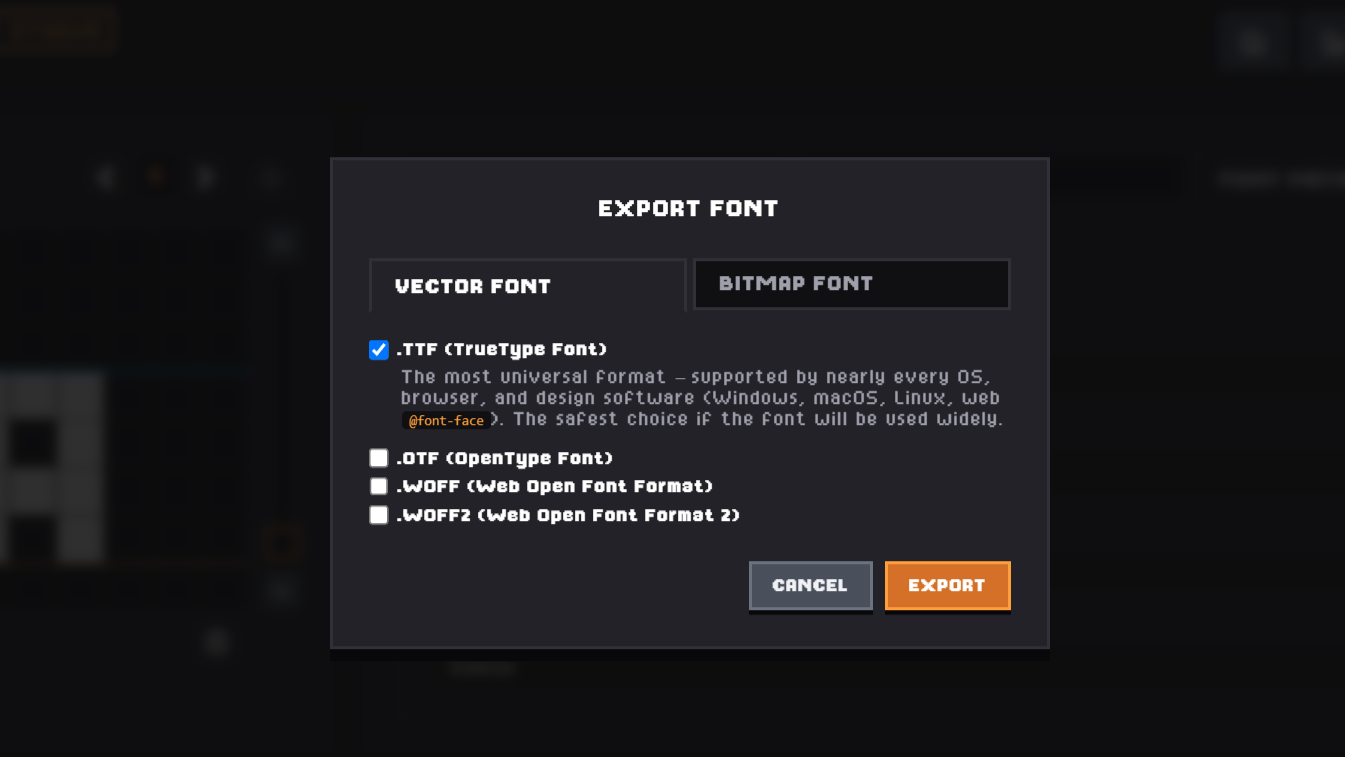
Vector export builds real, scalable outline fonts from your pixel grid — every filled pixel becomes a small square in the glyph outline. You can select more than one format at once; PixBob bundles multiple formats into a single .zip.
| Format | Best for |
|---|---|
| .TTF (TrueType) | The most universal format — supported by nearly every OS, browser, and design tool. The safest default if you're not sure what you need. |
| .OTF (OpenType) | Common in professional design software (Adobe, Affinity) and print workflows. Pick this if your target software specifically asks for .otf. |
| .WOFF | Compressed for the web — smaller file size, faster page loads. Use for @font-face if you need to support older browsers. |
| .WOFF2 | Even smaller than WOFF, with better compression — the current standard for web fonts. Prefer this over WOFF unless you need very old browser support. |
WOFF2 needs an internet connection
WOFF and WOFF2 are built from the same underlying font data, but WOFF2 relies on a compression library loaded at export time. If that fails to load (e.g. you're offline), WOFF2 export will fail while TTF/OTF/WOFF still succeed.
Bitmap Fonts
Bitmap export packs every glyph into a single PNG texture atlas, plus a metadata file describing where each character sits in that atlas — the format most game engines expect for pixel-perfect text rendering.
| Format | Best for |
|---|---|
| FNT + PNG | AngelCode BMFont (text) format — the most widely supported by game engines: Unity, Godot, LibGDX, Phaser, Construct, and more. The safest choice if you're unsure what your engine expects. |
| XML + PNG | Same data as FNT, wrapped in XML. Use this if your pipeline specifically expects an .xml file (e.g. some Starling/AIR setups). |
| JSON + PNG | Glyph position metadata as JSON — easy to parse in JavaScript, Lua, or Python. Good for custom loaders, PixiJS, or your own engine. |
| Only PNG | Just the atlas image, with no metadata file — for when you only need a visual reference or plan to build your own metadata separately. |
Atlas Scale multiplies every pixel in the atlas by an integer factor (1–32×) — useful when your engine needs a larger source texture than your canvas's native pixel size.
Tip
FNT, XML, and JSON exports are always bundled with their PNG atlas into a single .zip. Only "Only PNG" exports as a lone file.
Reference
Keyboard Shortcuts
| Shortcut | Action | Where |
|---|---|---|
| Ctrl+Z | Undo | Glyph canvas |
| Ctrl+Y or Ctrl+Shift+Z | Redo | Glyph canvas |
| Ctrl+Z | Undo | Live Text Preview (independent history) |
| Ctrl+Y or Ctrl+Shift+Z | Redo | Live Text Preview (independent history) |
| Right-click on canvas | Erase (regardless of active tool) | Glyph canvas |
On macOS, use Cmd in place of Ctrl. Tool switching (Pencil / Eraser / Move) and glyph navigation don't currently have keyboard shortcuts — use the on-screen buttons.
File Formats
| Extension | What it is |
|---|---|
.pfs | PixBob project file — plain JSON. See .PFS Project Files. |
.ttf | TrueType font — exported vector font. |
.otf | OpenType font — exported vector font. |
.woff / .woff2 | Compressed web font formats. |
.fnt | AngelCode BMFont text format — bitmap glyph metadata. |
.png | Bitmap font atlas image, or a standalone image export. |
Bitmap metadata schema
The FNT, XML, and JSON metadata formats all describe the same data: for every character, its position and size within the atlas PNG, plus horizontal offsets used for spacing.
info face="MyPixbobFont Regular" size=8 bold=0 italic=0 charset="" unicode=1 stretchH=100 smooth=0 aa=1 padding=0,0,0,0 spacing=1,1
common lineHeight=8 base=8 scaleW=136 scaleH=136 pages=1 packed=0
page id=0 file="MyPixbobFont-Regular.png"
chars count=2
char id=65 x=1 y=1 width=8 height=8 xoffset=-1 yoffset=0 xadvance=8 page=0 chnl=15
char id=32 x=0 y=0 width=0 height=0 xoffset=0 yoffset=0 xadvance=4 page=0 chnl=15{
"face": "MyPixbobFont Regular",
"size": 8,
"common": { "lineHeight": 8, "base": 8, "scaleW": 136, "scaleH": 136, "pages": 1 },
"pages": ["MyPixbobFont-Regular.png"],
"chars": [
{ "id": 65, "char": "A", "x": 1, "y": 1, "width": 8, "height": 8, "xoffset": -1, "yoffset": 0, "xadvance": 8, "page": 0 }
]
}PixBob Free Font License
Fonts you create with the free version of PixBob Font Studio are yours. Here's what that means in plain terms:
- You can use your font in personal and commercial projects — games, apps, videos, and other creative work.
- You can modify your font and distribute it as part of a finished project.
- You cannot sell or redistribute the exported font file itself as a standalone font asset.
- PixBob Font Studio does not claim any ownership over fonts you create — they're your work.
Note
This license covers what you can do with the tool's output. The License field in Font Metadata is separate — that's where you declare how others may use the specific font file you're exporting.
FAQ
Can I change the canvas size after I've already drawn glyphs?
Yes. Resizing pads or crops rows/columns from the top and right edge without rescaling your existing pixels — see Canvas Size.
Does importing a TTF overwrite my current project?
No — it always creates a new project. See Import TTF / OTF.
What happens if I close the app without saving?
Your work is autosaved locally and restored on next launch, but this local autosave isn't the same as an explicit .pfs save — see Save & Save As.
Can I sell fonts I make with PixBob?
You can use them commercially and distribute them as part of a finished project, but you can't sell the raw font file as a standalone product. See PixBob Free Font License.
Why does my WOFF2 export keep failing?
WOFF2 needs to load a compression library at export time, which requires an internet connection. TTF, OTF, and WOFF don't have this requirement. See Vector Fonts.
Troubleshooting
Export button says "Canvas is empty"
Every glyph in your font has zero drawn pixels. Draw at least one glyph before exporting.
TTF/OTF import found "no glyphs" or "no printable characters"
The font file may not contain standard Latin characters in the expected range, or may be an unusual/corrupted font file. Try a different font to confirm.
Quick Save keeps re-prompting for a file location
Your browser may not support remembering a file handle between sessions, or permission for the previously saved file has expired. Use Save As once to reconnect, then Quick Save should resume working normally for the rest of the session.
A hand-edited .pfs file won't load correctly
Check that every row in every glyph's pixel grid has the same number of entries as your project's gridSize. Mismatched rows are the most common cause of glyphs rendering incorrectly after a manual edit.
Still stuck?
This page covers behavior confirmed directly from the app itself. If something you're seeing isn't described here, it may be edge-case behavior not yet documented — treat this page as a living document that will expand over time.